
‘At once the white horse sprang away and sped like the wind along the last lap of the Road. At the same moment the black horses leaped down the hill in pursuit, and from the Riders came a terrible cry, such as Frodo had heard filling the woods with horror in the Eastfarthing far away. It was answered; and to the dismay of Frodo and his friends out from the trees and rocks away on the left four other Riders came flying. Two rode towards Frodo: two galloped madly towards the Ford to cut off his escape. They seemed to him to run like the wind and to grow swiftly larger and darker, as their courses converged with his.’
Time for a review of the final Nightmare quest from The Black Riders Saga Box – A Flight to the Ford! This is also part 3 of my Nightmare Campaign as well and will be the first quest where I have to be very careful as far as burdens are concerned. My normal strategy when playing this quest is to only take the single compulsory burden, that you reveal when you travel to The Last Bridge, and to concede and restart the game any time I am forced to reveal a second burden. This means I obviously never take advantage of the effect on the campaign card for this quest. I’ve never really had much trouble with the normal version of this quest so the various shortcuts (such as The Old Road’s action effect) and ability to cancel attacks by taking an extra burden just seems so unnecessary to me. Making these choices will punish you further down the line when playing every single other quest in your campaign and are a heavy tradeoff. When playing the normal version of the quest I often also focus on trying to rid the board of Nazgul enemies on Stage 2 to achieve victory after only placing 15 progress tokens, something tells me that in the Nightmare version I am really going to need the full 30 progress to stand any chance of beating the quest!

Now going into this Nightmare quest I actually expected this to be the easiest of the three Black Riders Nightmare quests and my expectations were completely shattered. What was originally the easiest of the three quests in the Black Riders box is now an absolute beast in Nightmare mode. Sure you don’t have quite as epic a showdown with Nazgul as you do in A Knife in the Dark and sure there are no awful hide tests like A Shadow of the Past but holy hell are the Nazgul plentiful and on your case constantly in this quest! Every single game I played, of which there were quite a damn few, was absolutely jam packed with Nazgul and they were ALWAYS the main concern with locations and treacheries being of little concern at all or instead only strengthening the Nazgul in various ways. Not only are there quite a few actual Nazgul enemies in the encounter deck but there are plenty of effects that fetch them from the encounter deck as well as a few that make them very hard to kill by returning them to the staging area. During this Nightmare quest the Nine Riders (that’s right there are 8 Nazgul enemies and the Witch King so we are literally facing all nine of them!) are truly always following you and they do not let up one bit. It is far more thematic than the original quest as it feels much more like a chase especially any time you manage to break away from your foes by placing lots of progress or defeating a few Nazgul.
I suffered countless defeats (at least fifteen or so) and my eventual victory was a close call and constant struggle throughout. Frodo survived with only 3 “life” left and had the game gone on a few more turns the Witch King and co may very well have taken the advantage back and destroyed a hero or two. My main strategy was to focus on combat more than anything else early game and to try and take out the two Nazgul that start in staging during setup as fast as possible. I would then attempt to ramp my questing strength later in the game only once combat was as under control as could be and I had the means to take on and defend against several Nazgul at any time. There was pretty much always at least one Nazgul in play and often several at once. Due to to their impressive defensive stats and ability to return to the staging area at times (due to Steed attachments or shadow effects) it was extremely hard to defeat more than one at a time during each combat phase. A few highlights of my victory included discarding two copes of Ringwraith as shadow cards in a single combat phase (rather than having them be shuffled back into the encounter deck), managing to play both Faramir and Boromir allies in the same single turn quite early on as both were integral to my victory, Eldahir making an epic sacrifice at a critical moment, managing to completely ignore and overcome the threat of two copies of Ettendales in staging, only earning a single burden card, questing with roughly 40 or so total willpower over the last few rounds and managing to easily survive two extremely tense rounds in which The Nine are Abroad was revealed and all characters text boxes were blanked. In the past cards that blank character text boxes could be absolutely devastating as I used to play using Elrond’s twin sons Elrohir and Elladan and without their abilities and inherent boosts they were severely crippled especially during critical rounds in which several nasty enemies needed to be dealt with. This effect stopped Legolas from placing progress, Gimli from readying a hero and Aragorn from engaging enemies with his effect but it didn’t stop my heroes from making multiple defenses (via UC or Armored Destrier), having boosted attack via weapon attachments or using their Rings of Power. This effect actually has very little effect on my new decks and I was quite surprised how easily I was able to deal with it.
Here is a picture of my final board state just for reference:

Almost every single loss I suffered was due to a hero death from an undefended attack with only a very few select games being lost due to threat or threat in staging getting out of control and me conceding because of that rather than due to a hero death. To really break things down my undoing for the vast majority of games was specifically not planning for Nazgul making additional attacks from nasty shadow effects or intentionally just hoping to avoid them. It was very hard to plan or prepare for this however as I needed to quest with everyone possible to keep on top of threat, progress and locations and needed as many characters to counter attack Nazgul as well so keeping backup defenders ready was not really an option anywhere near as often as it needed to be. I very stupidly forgot all about Mr. Underhill for several games which I feel quite embarrassed by as I specifically chose it over Gildor Inglorion even though I sometimes forget to use it as I was hoping that this time would be different. Once I started using Mr. Underhill regularly during the first combat phase to further strengthen my strategy of taking out the first two Nazgul as quickly as I possibly could things started getting a lot better and I was not getting quite as devastated quite so quickly anymore.
Even more embarrassingly I somehow forgot to use the boons I earned during A Knife in the Dark for this quest further handicapping myself for no reason other than my own forgetfulness. The reason for this was that between originally setting this quest up and then eventually beating it several days later I had to move all the cards and my play area at one point. I somehow misplaced the earned boons and did not put them back and then didn’t realize I had done so until I managed to beat the quest. Really stupid mistake I will not be making again and not something I have ever done before playing Campaign mode. Perhaps my focus on the new Nightmare cards and effects and keeping track of my games for these articles took up the majority of my attention leading to this silly mistake. At least it doesn’t really compromise my win as I only handicapped myself unintentionally which only made my victory more difficult to obtain if anything.
Now that I have briefly gone over my various games and the key strategy to my eventual win here is each Nightmare card with a breakdown based on my experiences:

The Original quest not only does not require you to clear the Ford of Bruinen to achieve victory but the original copy of Ford of Bruinen, that is now replaced in this Nightmare quest, actually has a beneficial effect and an extremely powerful one at that. It essentially discards all engaged enemies when it is cleared allowing you to potentially discard several Nazgul at once! The new version of this location featured in the Nightmare quest instead forces each player to search for a Nazgul enemy and put it into play engaged with them. Pretty drastic difference no? This is a far more extreme difference than the one between the different versions of Weathertop from the previous quest. It may not seem that bad at first but not only do we lose the powerful beneficial effect but there are likely already going to be several Nazgul in play when you need to travel to Ford of Bruinen including the Witch King himself so an extra two may be far more than you can actually handle. This was the case in a few of my losses when I actually managed to reach Stage 2 and the extra Nazgul were my undoing right near the finish line. These losses were still not as close as they may sound as I had very little progress on Stage 2 and traveled to the Ford of Bruinen as soon as I could. After several losses and then during my eventual victory however I flipped this strategy and instead only traveled to Ford of Bruinen after I had 50 or so progress on Stage 2 so that I won as soon as I cleared the Ford. This allowed me to only have to deal with the two additional Nazgul for a single turn before achieving victory but was also pretty risky considering the new Nightmare treachery that can remove all progress! Anyway I’m getting sidetracked big time, on to the back of the Nightmare setup card.
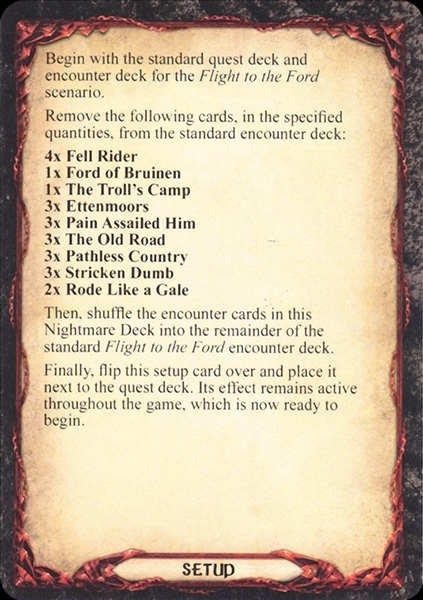
More so than in normal Nightmare quests, Saga Nightmare quests seem to really focus on only removing the absolute weakest encounter cards and anything that is even close to beneficial for the players. Upon first glance this quest doesn’t seem to be too bad as far as this is concerned as we do lose cards like Pain Assailed Him, Stricken Dumb and The Old Road which seem fairly nasty. When you look at the new cards that replace them in this quest however you can see that we get more or less the same effects but ramped up and more damaging. Instead of The Old Road we see the Ettenmoors which reveals a burden card ANY time it is explored not just from some shortcut action effect like The Old Road which can still be cleared normally without revealing an extra burden. Pain Assailed him is replaced with Come Back which not only also reduces the Ring Bearers life by 1 but also removes all progress from the quest and has doomed 1 which is similar to Stricken Dumb’s effect. We obviously lose The Troll’s Camp which is super beneficial for players and Pathless Country which is more or less harmless. Finally all four copies of Fell Rider are replaced with the new version with the same name which is a far more fearsome foe.


The new version of Fell Rider as first doesn’t seem that much worse. It does have an extra point of threat, attack and defense but its new forced effect isn’t that bad so long as you don’t chump block. The original version of Fell Rider has an ability that can reduce the ring-bearers life without needing to destroy a character and simply by making the first player choose whether to engage it during the encounter phase while its in staging. This ability only triggers while in staging sure but I often found it fairly troublesome in the original version of the quest. I severely underestimated the Nightmare version and forgot that in the original quest the Fell Riders are at least a fair bit weaker than the Ringwraith enemies so give you somewhat of a break or respite from the hardest foes in the quest. The new version has BETTER stats than the Ringwraiths so even with an ability that is not that bad it is still an incredibly fearsome foe and powerful combatant. Another very important point to make is that the original doesn’t have a shadow effect and the new version has a somewhat powerful shadow effect.
Plus 1/2 attack isn’t that much of a boost but considering the lowest attack strength on any enemy in this quest is 5 this boosts an attack to 6 or 7 which is pretty damn high and will require a strong defender for sure. Finally the art on this card is really interesting and gives us a really cool piece that focuses on the Nazgul as they appear in the wraith-world. It is probably as they would appear to either Frodo, who has been stabbed by a Morgul blade and is able to see their true form because of this, or Glorfindel who I assume would be able to see their true form purely due to his inherent wisdom and power.

I have already covered the difference between the normal and nightmare versions of Ford of Bruinen so there isn’t much extra to add. You need to clear this location to win now so although you want to clear it quickly to not only remove its threat and get its nasty travel effect over with you but also to remove the win condition you need to be very careful when you travel there and although I thought it safe on many occasions it ended up leading to my defeat more than once. The art on this card although washed out and very dreary is still quite beautiful in my opinion and captures the Nazgul’s reluctance to cross the river perfectly even if it doesn’t feature the epic wave and rush of water that is conjured to wash the Nazgul away. Perhaps this is not featured specifically because the location no longer conveys that event or allows you to discard engaged enemies when explored!

The Great East Road was one of my favorite cards to see during staging and one of my most hated cards to see flipped during shadow cards being revealed. A more or less harmless location considering most Nazgul have low engagement cost anyway and have other ways to engage you or wreak havoc and an utterly awful shadow effect that can easily lead to a hero death from an unexpected attack against the wrong deck or player. X is never THAT high and usually not as high as the 5 threat on Ettendales and there is no travel effect so it is easy to quickly travel to this location and clear it in most situations removing its effect and threat from play quickly. The art on this location is a lot brighter and a bit more cartoonish in a way than most art in the game especially Nightmare art so it stands out drastically next to the other cards in this quest which is quite interesting. I do like it but it is very different to what we normally see in this game.

One of the nastiest Nightmare cards I have seen so far in my Nightmare Campaign for sure! A truly awful location that not only has an incredibly high 5 threat but has a downright unacceptable effect when it is explored in any way. It shuffles the top card of the burden deck into the encounter deck which essentially also earns you that burden for the rest of the campaign… There are multiple copies and you could easily earn multiple extra burdens just because of this location if you don’t completely avoid it like I did.
Even ignoring it or leaving it in staging however can be detrimental not only because of the 5 threat but because it still triggers even when explored in staging so cards like Northern Tracker or Greyflood Wanderer are essentially no go if you want to avoid the forced effect. The shadow effect this card provides is awful as well and boosts a Nazgul attack up to 7 attack strength and also reduces the Ring-bearers life by 1 if the attack destroys a character. I did not ONCE travel to this location and also did not trigger Northern Tracker’s response any time a copy was in staging during a game. It just did not seem worth it to me to earn a burden just to get an easier win in this quest. Honestly my pride and refusal to take any extra burdens was probably my downfall during many losses and I may have pulled off a win much earlier if I had possibly used the Campaign Card effect (that allows me to cancel enemy attacks) or cleared a location such as this one at a critical moment. I would have earned additional burdens however so it would not have been a complete victory to me and as much as I was punished for it I am glad that I stuck to my guns and managed a win with only one burden earned!

Trollshaw Forest can reduce the Ring-bearer’s health by several points if it is in staging while you cancel multiple when revealed effects so it is ideal to explore it quickly and remove its effect from play. Even traveling there reduces the Ring-bearers life by 1 though so no matter what it is always going to reduce the time you have to beat this quest. It also has a decent 3 threat so I usually traveled here whenever possible to just get rid of it quickly and somewhat painlessly. It has no shadow effect which is nice and offers some respite from additional attacks or other nasty shadow effects during combat. The art on this location is rather interesting and features what I can only assume are Orcs or potentially smaller Trolls lurking in the forest? Not the worst location you can see in this quest but definitely one you want to clear quickly if possible to keep the amount of damage it does to a minimum.
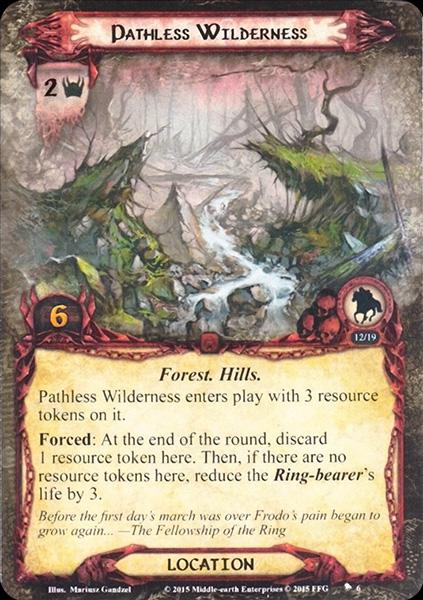
Pathless Wilderness is not so bad either. A low threat of 2 and a full three turns to clear it before the forced effect triggers and reduces the Ring-bearers life by 3 means it poses little to no challenge or threat so long as you have staging somewhat under control. It can seriously reduce the amount of time and/or turns you have before the Ring-bearer’s life is reduced to 0 and you lose if it does trigger though so can be a serious setback if you aren’t careful. I am happy to say that I avoided its effect from ever triggering during all my attempts at this quest. Like Great East Road or Trollshaw Forest this location was not so bad and was something I was usually happy to see instead of seeing yet another Nazgul or awful treachery appear.

The Twilight World is an interesting new treachery/condition attachment that we get in the Nightmare version of this quest. It has doomed 2 which is never something you want to see and has a nasty when revealed effect that handicaps the Ring-bearer quite badly. While attached to the Ring-bearer as a condition attachment it forces you to either exhaust the One Ring or reduce the Ring-bearer’s life by 1 at the start of each planning phase. It either enhances various encounter cards that are buffed when the One Ring is exhausted and stops you from using the One Ring for any player effects (Frodo’s ability to cancel an encounter card and replace it for example) OR it reduces the Ring-bearer’s life by an additional point every round (on top of the point it will always be reduced by due to quest card effects). The first effect makes the quest more dangerous and difficult and the second effect severely limits the amount of time that you have to complete the quest before you lose automatically. I found myself pretty much always exhausting the One Ring as I always needed as much time as possible to complete the quest due to just how much questing and combat power you need to have set up to actually beat this quest and the fact that there aren’t that many cards that are buffed from the One Ring being exhausted the worst of which is probably the Ringwraith’s themselves. I also cancelled this card with Test of Will or removed it as a condition attachment with Power of Orthanc in a few games to remove its nasty effect from play entirely, due to a rather low amount of doomed cards or cards that increase your threat in this quest the doomed 2 from Power of Orthanc was never that much of a concern. Overall definitely not the worst treachery or condition attachment we have seen so far but not one that should be taken lightly. So long as you can handle any nasty effects you will see because of the One Ring being exhausted or bring plenty of condition removal/cancellation however you can fairly easily handle this card and its effects.
The art on this card is yet another piece that depicts the Nazgul (and the Witch King specifically in this case) as they appear in the wraith world. The intricate details on the face, crown, tattered parts of the cloak and hand are just wonderful and this is definitely one of my favorite art pieces so far in the Nightmare Saga quests.
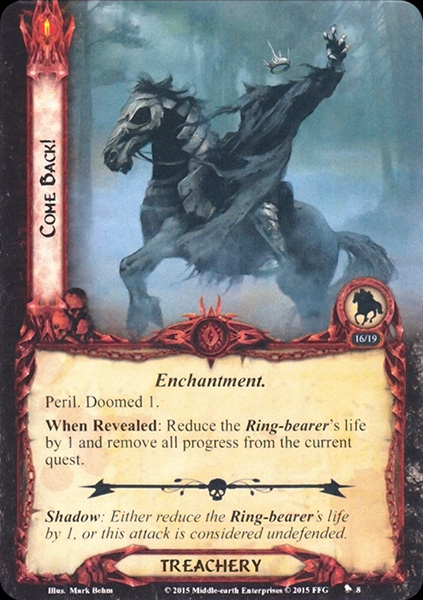
Come back is the final Nightmare card and second new treachery in this Nighmare quest. It has peril so can only be cancelled by the player/deck that reveals it during staging and has not only doomed 1 but also reduces the Ring-bearers life by 1 and removes all progress from the current quest. If this treachery appears at the wrong moment it can massively slow you down and stop you from clearing a quest stage when you want or need to. I could easily see this card appearing at a critical moment near the end of a game pulling victory from your grasp and causing a loss but thankfully this did not occur during any of my games. Due to my strategy of slowly building forces then questing as hard as possible over several key turns this card usually did next to nothing and only removed a few points of progress. I did have it remove some 10 or so progress from the first quest stage during just one or two games but these games were ultimately lost due to hero deaths from enemy attacks anyway and not due to threating out or the Ring-bearer running out of life so this card was not really a part of my demise. Much like the last treachery; The Twilight World, so long as you have cancellation or can deal with the effect (by being able to place tons of progress at a time) this is not the worst treachery you can see in this quest or that we have seen so far in the Nightmare Campaign. Devastating at a critical moment but more or less harmless the majority of times it will appear so long as you are prepared. This art in this card offers a great view of the Nazgul as they appear in the normal world or “dimension” of Middle Earth, as opposed to the wraith world. As we can see the Nazgul are completely unseen or invisible except for their clothing and weapons. We can see the Witch King’s floating Crown sitting upon his unseen head and neck. I love this art piece as well and it is a really cool depiction of the Nazgul and their invisibility/intangibility. I really like that this Nightmare quest features art that shows the Nazgul in both of their forms both seen and unseen as it creates a really thematic juxtaposition that shows how Frodo and Glorfindel would be seeing the Nazgul and how anyone else would see them.

Although not a Nightmare card this treachery was one of the worst cards that could appear during this quest as I almost always had a few Nazgul engaged with my decks so this card would result in multiple additional attacks often ones I was not prepared to deal with on top of the attacks I knew I would already face later during the combat phase. The shadow effect is also nasty and is a secondary way for the encounter deck to remove all progress from the current quest alongside the treachery Come Back.

Although I mentioned near the start of this article that I managed to overcome this treachery card and its effect with ease with my new decks it was still a card that made rounds far more tense whenever it appeared. Additionally the shadow effect on this card and effect on the encounter card Black Steed both return Nazgul enemies to staging which makes them harder to kill and allows them to contribute their threat to the staging area after being engaged with a deck.
CONCLUSION
The Nightmare version of this quest is far more thrilling, thematic and difficult than the original and I had a great time trying to overcome it and battling off endless Nazgul while doing so. I was definitely surprised at just how difficult this quest was, even if I did implement some very foolish handicaps in the form of forgetting about including the boons from Knife in the Dark at all and forgetting about Mr. Underhill for the first several games, and it was potentially the hardest of the three Black Riders Nightmare quests or at least on par with A Shadow of the Past. My silly mistakes were certainly handicaps I did not need to have and I massively regret evidently not paying enough attention to notice them. Nazgul harry you at every point and it is a constant struggle to both keep combat under control and also quest hard enough to make progress quickly. No matter how fast you defeat Nazgul they will always quickly reappear and I found that it was near impossible to clear them from play entirely and definitely not possible to keep it that way for more than a single turn. Essentially after realizing this a few games in I came to understand that defense was going to be way more important than offense for this particular quest. Strong defenders with readying attachments are extremely key for this quest as there are tons of nasty shadow effects that cause additional attacks and because there are only Nazgul enemies in this quest any unexpected or extra attacks that you cannot deal with are more or less guaranteed to result in a hero death.
Condition removal and location control were nowhere near as important as the last two Nightmare Saga Quests and I honestly cannot stress enough how much you need to chiefly focus on combat and strong questing. This quest starts off hard from the get go with the two Fell Riders that start in staging and a high likelihood of a third Nazgul appearing during the first round of staging (this honestly happened in the vast majority of my games). Combat tricks and attack cancellation goes a long way in this quest and feint was absolutely critical to my decks eventually overcoming this quest. I recommend questing strongly at the end and trying to clear both quest stages within a few turns once you have everything under control especially combat. I also recommend not worrying about destroying Nazgul too much as they can easily reappear quickly and effectively, that being said you do need to take them out from time to time or you will easily get swarmed.
To sum up this Nightmare quest has much sharper fangs then you may first think or assume from the Nightmare cards that are included and the cards that are taken out.
More so than any specific Nightmare encounter cards or their effects or any particular mechanics (like hide tests or having to shuffle additional Nazgul in to the encounter deck) this quest is hard because of the total sum of its parts; the frequency of Nazgul, the especially nasty percentage of cards with devastating shadow effects and just how hard you need to quest and defend if you want to stand any chance of beating this quest. The main mechanic you need to worry about in this quest (shuffling additional burden cards into the encounter deck and subsequently earning them in your campaign) doesn’t affect the difficulty of this particular quest by that much as they may not even appear and instead just makes the overall campaign much harder. This only makes the quest even harder for players like myself who refuse to take additional burden cards as it means you have to ignore cards like Ettendales and the Campaign Card. Although I still really enjoyed this Nightmare Quest it was one hell of a challenge to overcome and I was certainly frustrated at times. This was mainly exacerbated by the fact I forgot to use Mr Underhill for so long or my recently earned boons at all though so was partially my fault.
Campaign Choices:
I managed to achieve a victory upon which I only earned a single burden card which was always my goal for this Nightmare quest. I did earn a Burden that is a little nastier than either of the two I usually hope for but that’s alright as it was not the worst of them either so I am fairly happy with my campaign pool so far.
I earned the Burden Fear of Discovery which is the second worst Burden you can earn in this quest in my opinion. I rate them from worst to best: Weight of the Ring, Fear of Discovery, Panicked, Overcome by Terror and Eaten Alive!
I usually try or hope to earn Overcome by Terror or Eaten Alive! so it is not ideal to earn Fear of Discovery instead but I am just happy to only be taking the one burden especially in Nightmare mode.
Going forward, whenever possible it will potentially be more ideal to hold the Ring Bearer back for combat, instead of using him to quest as I normally would, so that if Fear of Discovery appears I can simply exhaust the Ring bearer instead of having to reveal an encounter card on top of the one revealed by the fact Fear of Discovery has surge.
My current campaign pool is now as follows:
Boons
-Mr. Underhill (attached to the Ring-bearer during setup)
-Old Bogey Stories (attached to a hero of the first players choice during setup)
-Ho! Tom Bombadil! (placed in the first players hand during setup)
-Tireless Ranger (attached to Gimli during setup)
-Noble Hero (attached to Elrond during setup)
Burdens
-The Ring Draws Them (shuffled into the encounter deck during setup)
-Fear of Discovery (shuffled into the encounter deck during setup)
I have now beaten the first three Campaign Nightmare quests and have completed Nightmare The Black Riders in its entirety! I am very excited to move on the to the first Nightmare quest in The Road Darkens; The Ring Goes South, in the near future. I am one step closer to Nightmare Journey in the Dark however which is very scary!
I will probably take a short break from my Nightmare Campaign and Nightmare Reviews as I should receive Sands of Harad later this week and plan to do a turn by turn article or two on the new quests. I have also ordered Nightmare Treason Of Saruman though so will at least be providing spoilers for those quests in the near future as well.
As always I hope you enjoyed the read as much as I did playing this quest and managing to eventually overcome it! Any feedback or suggestions for the upcoming Nightmare Saga quests are more than welcome!

Won it finally. Frodo had 2 life remaining and I had to take two burdens – Panicked and Weight of the Ring unfortunately. It took around ten frustrating tries and re-reading of this post to understand that I really have to put more emphasis on defense and with some amount of luck I got it going. Beregond luckily got his readying attachments early, somehow withstood early Fell Riders without Gondorian Shield and Burinng Brand, which came at round 6 and 8 respectively. Threat management was the second key – I was thinking long and hard whether to play Double Back or not, then blitzed through it to stay under 30 with a little help from Galadriel and Elrond’s Counsels.
A Burning Brand appeared just in time to cancel Witch King’s shadows, which would be devastating. Galadriel+Nenya made Beregond eligible for defending his attacks, awesome combo!
Two cards I learned to love through NM Black Riders are Protector of Lorien and Lords of the Eldar. PoL helps greatly with progress control which is crucial in Shadow of the Past, when you definitely don’t want to advance too early (side quests are useful in that regard, too). LotE on the other hand was bouncing in and out of my Noldor deck since it mostly looked like a “win more” card, but in NM campaign the pressure never stops – I played the card three times during my win.
I’m thinking about exchanging Gather Information for Scout Ahead just for this quest and replay it to not gain any burdens at all.
Great scenario, great cycle.
LikeLiked by 1 person
Quick update: got to Rivendell with only Eaten Alive! as a burden 🙂
LikeLike
A much better result!
LikeLike