Greetings!
Once again I am returning from a hiatus both from the game itself and this blog. After a fair bit of a break I have started playing again in the last 6 months or so. I have also started playing with a friend semi-regularly who I have been teaching and introducing the game to. This has breathed some new life into the game as I have more or less always played alone up until now. I greatly enjoy playing with a friend but have of course also been playing Solo Two-Handed a lot of late as well.
I redesigned and really messed around with my player decks a lot over the last several months and end up trying out many deck types including but not limited to; Paired Gondor and Rohan decks, a Silvan deck and a Hobbit deck. Ultimately after a fair bit of experimentation and playing with deck types I have never really played or built before I have landed once again on a Three Hunters deck that utilizes the Forth the Three Hunters! contract and a Vilya based deck. How daring and exciting right? I’m basically going back to the exact same deck archetypes I almost always play.
I have however never really played with the Gandalf Hero properly and now that I have and have built an actual strong deck around him I understand just how crazy and powerful he can actually be. Vilya + Gandalf Hero is just such an absurdly strong combination.
This is not a post about my new decks however so let’s move on, here’s a link if you want a closer look or more detailed rundown of how they both function: https://ringsdb.com/fellowship/view/19016

Now as to the actual article I am writing today I thought it would be interesting to look at and compare all the various versions of the Nazgûl we have received in-game, both as far as art is concerned as well as the threat they actually pose across their various incarnations within the game. I am focusing predominantly on Nazgûl art and mechanics on Enemy Encounter cards as there are also quite a few quest stages and treacheries that feature Nazgûl art pieces as well, I may touch on some of these briefly.
I was inspired to write this article after seeing a post on reddit featuring an artists interpretation of the Witch King of Angmar. It’s such a unique piece and is so different to the usual depictions of the Witch King and the Nazgûl in general.
I really enjoy the clever inclusion of furs given Angmar would have likely been a very cold location – not that the Nazgûl were likely to feel the cold. In Middle Earth Gold is an element that has a much higher concentration of the ‘Morgoth-Element’ as it were so it makes perfect sense that some of Sauron’s Chief Lieutenants or Warriors would be clad in Golden attire or armor so I really enjoy his Golden armor both visually as well as from a thematic perspective. The huge Pole-axe/Halberd (Nazgûl are almost always depicted with swords alone) he is wielding and his spiked gauntlet give off such a brutal and savage vibe. The winding mountain track and Fortress (Carn Dum itself perhaps?) in the background are also absolutely gorgeous.

https://www.reddit.com/r/lotr/comments/1al1lp4/witch_king_of_angmar_oil_on_panel_49x70cm/


We do get a few depictions of the Nazgûl within the art of the game that are also fairly unique. Both versions of Fell Rider have their own unique take with the original version featuring a pretty different and unique style of armor and helmet with no Hood or Cloak in sight.
In fact I have tracked down a bigger version of the artwork: https://www.deviantart.com/aleksanderkarcz/art/Fell-Rider-422798121 to get a closer look as it appears that the artist has actually made the Nazgûl’s arm and face completely visible. Although thematically this doesn’t really make much sense unless the picture is from the point of view of Frodo while wearing the Ring; creatively it is very cool to get such a different depiction.
The Nightmare version of Fell Rider is without question meant to be a depiction of how the Nazgûl would actually appear to those who can see their true form, it also gives me strong Easterling/Haradrim vibes so to me looks like one of the Nazgûl who was formerly an Easterling King or Sorcerer. Similarly the version of the Witch King we see in A Knife in the Dark and Flight to the Ford is also a depiction of how he would appear to those who can truly see him. Although the art is slightly abstract I like that he is almost a beacon of shining pale light. No idea how but I have never noticed until now that he is actually holding the smaller Morgul-knife that he uses to stab Frodo in his left hand (which is very specifically described as having a glowing pale light) but below in his other hand you can also see him holding a simply gigantic sword.
Finally we have the Wraith on Wings from The Flame of the West which has a very unique look. We get a lithe figure who doesn’t have any of the usual armor or clothing Nazgûl are shown wearing and instead has a long flowing cape that almost looks like a wing in the way that it folds back above him. We also see a very curved scimitar type sword which again is unusual. It honestly almost looks like The Black Serpent riding a fell beast. We know that some number of the Nazgûl were originally Men of the East from areas like Harad and Rhun so depictions of them with an Easterling/Harad twist makes perfect sense and provides a really nice alternative way of artistically representing and capturing them that is perfectly in line with the lore.


There are also many fantastic art pieces featuring Nazgûl that appear on Treachery cards and the above are some of my favorites. Both Blade Tip and The Twilight World once again show the Nazgûl as they would truly appear and are actually Morgul attachments that are placed on characters rather than enemies. Call of the Ring also has some awesome art and is a thematic home run, the Nazgûl are drawn to the One Ring constantly and you must either exhaust the One Ring and reveal an encounter card or if you don’t the Nazgûl close in on your position.
Now that I’ve touched on some of the more unique Nazgûl art pieces lets move on to actually looking at the Nazgûl Enemy Encounter Cards within the context of actual gameplay.
Escape from Dol Guldur

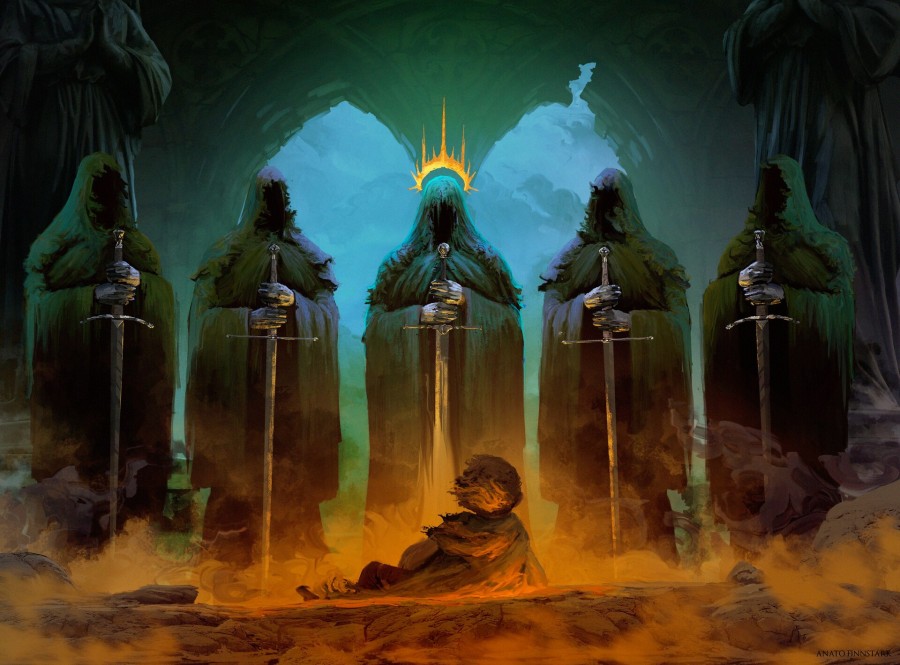
The very first Nazgûl enemy we see is in the Core Box and it appears during the finale of the third quest: Escape from Dol Guldur. The art on this card is absolutely incredible and features not only a Nazgûl atop a Fell Beast but also Dol Guldur itself in the background. The depiction of the Nazgûl with the extremely pointed hood and cloak makes it look to me like traditional depictions of Death or the Grim Reaper which I think is a nice touch.
This enemy essentially appears as a final boss for Escape from Dol Guldur once the captive Hero is rescued.
No attachments can be played on it and this is essentially an ability that every single Nazgûl enemy has in some form. Some Nazgûl will instead have the text “Cannot have non-Morgul attachments” as they appear in quests that have Morgul Encounter Cards that they can receive and gain boosts from.
Now where the real brutality exists is the fact that each and every time this enemy attacks, if it is dealt a shadow card with a shadow effect, the defending player MUST simply discard a character altogether. If you don’t take this enemy out as fast as possible this is going to cause serious problems, the quest does require you to defeat the Nazgûl to achieve victory so you can’t just quest past it either. Now it is in the Core Set but four attack especially for a Nazgûl (and a singular boss version of one at that) is honestly rather low and not that hard to deal with at all and it is rather the ability that discards a character that is very much the crux and real threat of this enemy. Now this isn’t actually a named or unique Nazgûl but I thought that the revised core set had changed the Nazgûl of Dol Guldur to be a unique enemy to avoid certain tricks that could be used against it. As far as I can tell this is not the case however due to the fact that the Nazgûl of Dol Guldur appears as a single copy and is clearly the boss enemy for the quest it is featured in I like to think of it as an honorary unique Nazgûl enemy.
Nazgûl of Dol Guldur
Actual Stats: 5 Threat, 4 Attack, 3 Defense and 9 hit points – takes 12 total attack strength to take out in one hit.
Really not that threatening as far as stats are concerned and it shouldn’t be too hard to dispatch over a few turns at most so long as you have decent combat capability.
Additional Abilities: A Fearsome ability that outright discards characters anytime a shadow effect is resolved during its attacks. You will want to defeat and get rid of this Nazgûl as quickly as possible.
The Massing at Osgiliath

The second Nazgûl we ever received was for the first ever Print on Demand Scenario: The Massing at Osgiliath. In this quest, while out on a scouting mission, your party essentially accidentally runs into the vanguard of a large Army led by The Witch King himself near Osgiliath. The vanguard of this army pursues you through Osgiliath, across the Anduin River and all the way to the safety of Minas Tirith. When you cross the Anduin and make it to the final quest stage The Witch King appears and takes chase personally! First off, as is always the case with Nazgûl: no player attachments can be played on him. His additional actual abilities are extremely nasty and can easily shut you down completely and spell your doom.
So to start with while he is in staging every single character in play gets minus 1 willpower which is huge and really limits the player’s ability to quest and make progress. Then we have his forced effect that will return him back to the staging area (making that first horrible ability active again) each and every time he attacks if the defending player doesn’t raise their threat by three. This quest already features a fair bit of threat raising from various encounter effects so this could potentially be the nail in the coffin that pushes a player over the edge of threating out.
This version of The Witch King needs to be taken out as fast as you can possibly manage or he will cause players to threat out either from his direct threat raising ability or from questing unsuccessfully due to the huge loss of willpower from his other ability. Technically you don’t need to defeat him to beat the quest but given how much he reduces your ability to quest successfully or efficiently it is generally a better idea to take him on even if you cannot take him out simply to keep him engaged and to shut down that global willpower reducing ability.
The Witch-King
Actual Stats: 6 Threat, 6 Attack, 6 Defense and 11 hit points – takes a whopping 17 total attack strength to take out in one hit!
Six across the board for his stats, the number of the beast! Six attack and defense is no joke and neither is his big pool of hit points. This is proper boss territory stats especially for a quest that appeared so early on.
Additional Abilities: Both of his abilities can easily directly lead to an instant loss by causing players to threat out or simply become completely overcome by not being able to progress or beat Stage 4 fast enough. You either want to quest as hard as you possibly can while avoiding him and hope that you can still quest to victory even with his global willpower reduction or you will need to take him on and beat him as quickly as you can as raising your threat by three just to keep him engaged and have a chance at a counterattack is pricier than it seems, especially in a quest that already likes to raise your threat in many other ways.
A Shadow of the Past


The first unnamed and non-unique Nazgûl we encounter in multiples are in all three quests of the first Saga Deluxe box: The Black Riders, and there are quite a few of them. First off are the titular Black Riders themselves in A Shadow of the Past and let me just say the first proper introduction to Nazgûl enemies is certainly not a tame or forgettable one.
A Shadow of the Past sees you trying to escape from the Shire with Nazgûl hot on your tracks. A unique element of this quest are the “Hide Tests” you will be forced to perform quite often and should you fail a Hide test at any point while a Black Rider is in play not only will the first player be forced to engage it if it is in the staging area but it will also make an immediate attack against them as well, this can and will occur at all three quest stages in this quest.
This can be utterly devastating especially when multiple Nazgûl are in play as not only are you forced to engage them potentially before you are ready to take them on but they also each perform an additional attack outside of the combat phase. Failing a Hide test early on in this quest can easily result in facing 4 Nazgûl attacks from a pair of them being forced upon a single player/deck and four enemy attacks all at 5 attack strength plus whatever shadow effects you might see is not exactly something most decks can handle during the very first turn.
The Black Rider has Hide 2 on it which means it forces the player revealing it to take a Hide test so yes these enemies do trigger a Hide test of their very own when they appear.
This may be the first generic Nazgûl enemy we saw released for the game but it is honestly still one of the nastiest to this day. Not only forcing Hide tests every time they appear but that potential for extra attacks on top of those already made in the combat phase can be pretty brutal from a five attack strength enemy, especially in the first few turns when you are still trying to get setup. These Nazgûl enemies are definitely amongst those you want to destroy and remove from play as fast as possible to avoid potential extra attacks being made from any future failed hide tests.
This is also the start of Nazgûl text often being changed to “cannot have non-Morgul attachments” rather than simply “cannot have attachments” as we start to see Morgul attachments that can appear and buff Nazgûl enemies.
If you play the Nightmare version of this quest there is a secondary generic Nazgûl enemy as well as a unique boss Nazgûl in Khamul the Easterling. The Dark Horseman functions very similarly to the Black Rider in that it forces the player revealing it (also features the Peril keyword so other players cannot cancel this card being revealed with Frodo’s ability for example) to make a Hide 2 Test, it does not however engage the first player and make an immediate attack when a hide test is failed. Instead while it is engaged with you characters you control get -1 willpower during Hide Tests.
Basically instead of engagement and additional attacks triggering during failed hide tests this Nazgûl makes it harder for you to succeed in any future Hide tests while it is engaged with you.
Honestly so long as you have good combat capabilities in your deck/s and can take this enemy out fairly quickly I find it far less troublesome or dangerous as the Black Rider. It also has 1 less attack strength and threat but the same defense and hit points as the Black Rider so stat-wise it is not quite as fearsome either. Now being engaged with this enemy and not being able to destroy it across multiple turns would indeed provide very troublesome and could provide the potential for things to spiral out of control if you can’t succeed at any Hide tests but I’d still rather see this enemy appear than a Black Rider basically nine times out of ten. Only one attack to face each turn and an effect that doesn’t really do anything if you defeat the Horseman the same turn he engages you. One thing to note is that the Dark Horseman does have an engagement cost of 25 which is very low for a Nazgûl enemy, the vast majority of decks will have no choice but to engage even in the first few turns.
Finally we have Khamul the Easterling and he is pretty damn awful. He has one more threat, one more attack strength, the same defence and two more hitpoints (for a total of 8) compared to the Black Rider so he is both harder to take out and hits harder as well. He gets -30 to his engagement cost while the One Ring is exhausted which brings it down from 40 to 10 essentially meaning if the One Ring gets exhausted he is more or less guaranteed to engage a player.
His forced effect is absolutely horrific, it forces the engaged player to make a Hide 2 Test during the refresh phase and if you fail this Hide Test Khamul makes an immediate attack. This effect and failing a Hide Test in general could potentially trigger multiple other effects including engagement and additional attacks by Black Riders. Essentially unlike the Black Rider who makes a player perform a single Hide Test when revealed Khamul will make an engaged player perform a Hide Test every single turn until he is removed from play/defeated. Take him out ASAP before he leads other Nazgûl to you and starts a chain reaction of Nazgûl engagement and attacks.
Black Rider
Actual Stats: 4 Threat, 5 Attack, 4 Defense and 6 hit points – takes 10 total attack strength to take out in one hit.
These are pretty standard stats for Nazgûl as 5 Attack Strength seems to be the standard default value for most non-unique Nazgûl and 4 defense is pretty common as well.
Additional Abilities: Forces you to perform a Hide test when revealed, also engages and performs additional attacks when Hide Tests are failed. You want to get rid of these Nazgûl as soon as possible as their ability always stays relevant and the more of them in play when a Hide Test is failed the more trouble you will be in.
Dark Horseman
Actual Stats: 3 Threat, 4 Attack, 4 Defense and 6 hit points – takes 10 total attack strength to take out in one hit.
Somewhat low attack strength at only 4 which is the lowest attack value you will see on any Nazgûl enemy.
Additional Abilities: Reduces the engaged players characters willpower when committing to Hide Tests. Can be nasty but honestly nowhere near as bad as the Black Rider. Should still be dispatched as fast as possible so that their ability doesn’t potentially hold you up more than you can afford.
Khamul the Easterling
Actual Stats: 5 Threat, 6 Attack, 4 Defense and 8 hit points – takes 12 total attack strength to take out in one hit.
Definitely a step up from normal Nazgûl stats (at this point anyway, later in the Saga Campaign they seem to get a big buff) both offensively and defensively. His 5 threat also shouldn’t be underestimated, if you do somehow avoid engaging him he still provides a ton of threat to the staging area.
Additional Abilities: Forces the engaged player to make a Hide 2 Test every refresh phase until defeated and makes an additional attack if the Hide test is failed, this can combo and lead Black Riders to engage you and make additional attacks as well. Take Khamul out as fast as possible or if you can somehow avoid him altogether do so!
A Knife in the Dark


Next we have the second quest in the first Saga Campaign box; A Knife in the Dark. Nazgûl are not only hunting us through Bree and the surrounding country side but there is also the showdown at Amon Sul with The Witch King himself at the end of this quest. Throughout the first two quest stages there is the possibility of encountering copies of Rider or Mordor or in the Nightmare version of the quest Menacing Wraith as well. Rider of Mordor is pretty tame compared to most Nazgûl as far as stats are concerned with only four attack strength, three defense and five hit points. While engaged with a player however it does reduce all their characters willpower by 1 which is certainly not something to scoff at as it could seriously hinder your questing power and potential. The Rider also gets -10 engagement cost when the One Ring is exhausted bringing his engagement cost down to 25 rather than 35. This effect or very similar ones are going to appear on many of the Nazgûl in the game which is very thematic and fitting given they are some of the Dark Lord’s only servants who even know about the One Ring’s existence in the first place let alone the fact they are drawn to it and are actively hunting for it. We already saw Khamul the Easterling with a similar effect (except much more potent) above.
Basically rather than aiming at being a big threat in combat, the Rider of Mordor aims to slow you down and reduce your questing capabilities, that being said four attack isn’t nothing and neither is the combination of three defense and five hit points, it just happens to be a little less threatening than most other Nazgûl.
The other generic Nazgûl we receive in the standard version of this quest is the Ringwraith. With an additional point in both attack and defense over the Rider of Mordor this Nazgûl fulfills more of a combat role. Ringwraith is also dealt an additional shadow card when it attacks if the One Ring is exhausted which can be pretty gnarly given it’s already strong combat stats. This enemy is interesting as you can potentially avoid it completely and stop it from ever being added to the encounter deck. Basically there are multiple effects and ways that out of play Ringwraith’s can be shuffled into the encounter deck during this quest, there is then an effect on the final quest stage that forces you to find all Nazgûl in the encounter deck and discard pile and put them all into play, this is the showdown at Amon Sul. If you manage to avoid these effects from ever actually shuffling an out of play Ringwraith into the encounter deck you can avoid these enemies being added to the encounter deck and appearing at the final showdown altogether.
In the Nightmare version of this quest there is an additional Nazgûl enemy; the Menacing Wraith. The very fact that this enemy is not put aside like the Ringwraith’s and is included in the encounter deck means you will always have to face the two copies of Menacing Wraith during the big showdown at the end of the quest which in of itself is a rather big deal. In the normal version of the quest you will only face three Nazgûl if you manage to avoid any Ringwraiths being shuffled in; 2x Rider of Mordor and The Witch King. In the Nightmare version even if you manage to do the same you will face 2x Rider of Mordor, 2x Menacing Wraith and The Witch King. In the Nightmare version if you really mess up and let all four copies of Ringwraith get shuffled in to the encounter deck you will be facing the full strength of the Nine Riders at Amon Sul. Menacing Wraith has the exact same stats as the Black Rider from the previous quest but with a different ability. While in play Menacing Wraith will engage and immediately attack the first player if the One Ring is exhausted. Given that the Nightmare version of Weathertop requires you to exhaust the One Ring to travel there this effect will not be easily avoidable by simply not using Frodo’s ability.

Finally we have The Witch King himself. Now at six attack strength, five defense and nine hit points he is the beefiest and strongest Nazgûl we’ve seen so far in the Saga quests but honestly not by that much. He is immune to player cards altogether rather than simply being immune to receiving non-Morgul attachments which does make him a bit more fearsome as he must be taken on and taken down traditionally without any special combat tricks. His engagement cost being lowered really doesn’t mean too much in this particular quest as you must defeat all Nazgûl in play to finish and beat the quest anyway so you are generally going to want to take him on and take him down as fast as possible. That being said many player decks may not be able to take on multiple Nazgûl at once and may plan to take them on at their own pace. If this is the case and The Witch King engages you before you’re ready then this effect could seal your doom I guess.
His second ability in my opinion can potentially be a little bit trickier, if your dedicated defender has 1 willpower you are in serious trouble, if you are using cheap chump blockers who are likely to have 1 or even 0 willpower again you are in trouble. Only those with strong willpower can even face The Witch King in battle and defend one of his attacks. Overall he is honestly really not that bad however and pales in comparison to the version of him we see in Massing at Osgiliath or other versions we will see later on! I think his main strength more than anything comes down to two things: needing a dedicated defender for him that has at least 2 willpower AND strong defense and the fact that he can appear with up to all 8 of his fellow Nazgûl who all have strong stats of their own comparable even to many of the bosses that appear in certain quests of the game. Even just facing three or four Nazgûl at once with one being the Witch King can be tricky and will require strong offensive and defensive stats and strategies to overcome.
Rider of Mordor
Actual Stats: 4 Threat, 4 Attack, 3 Defense and 5 hit points – takes 8 total attack strength to take out in one hit.
With a rather low 4 attack strength and only 3 defense and 5 hit points this is easily the weakest version of the Nazgûl we have seen so far.
Additional Abilities: The Willpower reduction effect can potentially be debilitating and really slow down your progress however other than this there is not too much overall threat presented with this enemy. So long as you can take it out the same turn you engage it you can avoid the Willpower reduction from having any real effect. Still an enemy you want to take out quickly to avoid the Willpower reduction sticking around but it doesn’t seem quite as urgent as removing Nazgûl such as the Black Rider from play.
Ringwraith
Actual Stats: 3 Threat, 5 Attack, 4 Defense and 5 hit points – takes 9 total attack strength to take out in one hit.
Additional Abilities: The additional shadow card the Ringwraith gains when attacking if the One Ring is exhausted can be much much nastier than it appears to be. This quest has multiple shadow effects that result in additional attacks and giving this enemy twice the chance to receive that shadow effect is not something you want to be doing. This is especially true when you are already engaged with multiple Nazgûl as the last thing you want is additional attacks from any of them. This Nazgûl seems rather straightforward and simple but this is not really the case, take them out quickly even before the Witch-King as they have far more opportunity for nasty shadow effects and additional attacks.
Menacing Wraith
Actual Stats: 4 Threat, 5 Attack, 4 Defense and 6 hit points – takes 10 total attack strength to take out in one hit.
With one more threat and one more hit point than the Ringwraith the Menacing Wraiths are a little bit stronger.
They are basically identical to the Black Rider from the previous quest as far as Stats are concerned
Additional Abilities: Unlike the Ringwraith rather than simply getting an additional shadow card if the One Ring is exhausted, Menacing Wraiths will straight up engage the first player and make an immediate attack when the One Ring is exhausted. This is so much worse as arguably the worst shadow effect you can see in this quest is giving the enemy an additional attack which the Menacing Wraith just straight up gains if you exhaust the One Ring. Avoid using the One Ring at all costs (unless you have to) until after you have taken these guys out.
The Witch-King
Actual Stats: 5 Threat, 6 Attack, 5 Defense and 9 hit points – takes 14 total attack strength to take out in one hit.
A bit of a step down from his appearance in Massing at Osgiliath stats wise but still a very strong enemy and not one you should underestimate.
Additional Abilities: His reduced engagement cost whilst potentially nasty isn’t really all that bad as you need and will want to destroy him as fast as you can anyway. Similarly his stipulation that characters can only defend against him if they have more than 1 Willpower can be largely ignored most of the time HOWEVER it can combo with Rider of Mordor who reduces all your characters Willpower by 1 when engaged which would then require a character to have at least 3 base willpower (or 3 before the minus 1 from Rider of Mordor at least) to be declared as a defender against the Witch-King.
I have rarely ever had trouble against this ability however I can see it being deadly against certain types of decks or in certain situations. As mentioned above I think this abilities potential and simply the fact that you are facing multiple other Nazgûl at the same time are the Witch-King’s biggest strengths and on his own (in this scenario at least) he is not that strong or troublesome.
Flight to the Ford


Up next is the final quest of the first Saga Box: Flight to the Ford, in which you are racing to get Frodo to Rivendell after he has been stabbed at Weathertop with the Morgul Blade, with all nine Nazgûl hot on your heels. Similarly to A Shadow of the Past (excluding the Evil Crows) you will only encounter Nazgûl enemies in this quest and boy are they intent on slowing you down and constantly reducing the Ring-Bearers life. Both the Ringwraiths and the Witch-King Enemy Encounter cards appear again in this quest so I won’t be going over them again and will focus on the new Nazgûl we see instead. The Ringwraiths can appear at any time much like the new Fell Riders and just like A Knife in the Dark The Witch-King only appears at the final quest stage as a boss of sorts.
Fell Riders aren’t as much of a threat as previous Nazgûl as far as their raw stats as they only have four attack, they also only provide two threat when in staging which honestly is pretty low. Their main focus is simply further reducing the Ring-Bearer’s health instead as they force you to reduce the Ring-Bearers life by 1 if the first player doesn’t instead choose to engage them during the encounter phase. This ability can be completely avoided if your decks have good combat capabilities as you can simply continue to engage the Fell Riders and take them out. They also don’t provide any further ongoing effects or abilities once engaged, unless they are returned to the staging area of course.
Then we have the Nightmare version of the Fell Riders which straight up replace the original Fell Riders in the Nightmare version of the quest. The Nightmare version honestly doesn’t really ramp things up that much at all. Yes they have boosted stats across the board except for hit points however their new replacement ability just isn’t that bad. Basically any time the Nightmare Fell Rider attacks and destroys a character you must reduce the Ring-Bearers life by 1, because I rarely ever rely on chump blocking this is an effect that will rarely actually trigger for me. You can potentially just leave this enemy in staging (if able) and ignore its three threat whereas the original Fell Rider will quickly cause a ton of damage to the Ring-Bearers life if you leave it in staging.
The last card from this quest I feel needs mentioning is The Nine are Abroad simply because it is such a thematic and mechanical win. The art features all nine Nazgûl racing along on their steeds and is an absolutely brutal encounter card that not only has an effect that can be hugely crippling for a turn but it also gains surge if there are any Nazgûl in the staging area. An almost must cancel for many decks and situations this Treachery has some serious fangs and could potentially lead to a loss on its own.
Whilst the Fell Riders really aren’t too much of a threat and are far more manageable than most Nazgûl enemies this quest does as mentioned above feature the Ringwraiths and the Witch-King as well who fill more of an actual combat role. On top of this the quest is very much a race quest as the Ring-Bearers life total slowly ticks down so there is more at play than simply defeating and overcoming Nazgûl.
Fell Rider
Actual Stats: 2 Threat, 4 Attack, 3 Defense and 6 hit points – takes 9 total attack strength to take out in one hit.
The Fell Riders have some of the lowest stats amongst Nazgûl enemies and are very similar to the Rider of Mordor
Additional Abilities: The Fell Riders ability can be bad news if you can’t handle them in combat and are forced to leave them in staging, it can however be completely avoided as I mentioned if you simply engage them and deal with them in combat. Probably the weakest and least threatening Nazgûl enemy so far in my opinion as the Rider of Mordor does at least have quite a powerful willpower reduction ability that can be crippling in the wrong situation, at worst the Fell Rider does a point or two of damage to the Ring-Bearer if you leave him in staging for a few turns while getting combat ready.
Fell Rider (Nightmare Version)
Actual Stats: 3 Threat, 5 Attack, 4 Defense and 6 hit points – takes 10 total attack strength to take out in one hit.
The Nightmare Version is more in line with other Nazgûl enemies as far as states are concerned and has very similar stats to the Black Rider with just 1 less threat
Additional Abilities: Again even the Nightmare version of the Fell Rider just falls short as far as abilities go and so long as you don’t chump block this ability should rarely if ever actually affect you. Decent stats but very weak ability.
Passage of the Marshes/Shelob’s Lair

Now we move onto the second Saga Box and the tenth and eleventh Saga Quests: The Passage of the Marshes and Shelob’s Lair. Frodo, Gollum and your chosen heroes attempt to navigate The Dead Marshes and inch ever closer to Mordor and then they begin the long climb of Smeagol’s secret way into Mordor via Cirith Ungol. Both quests features a single Nazgûl enemy in the form of the Morgul Wraith. This Nazgûl ramps things up slightly from the non-unique ones we see in the first Saga Box and initial three quests. With four threat, five attack, four defense and nine hit points this Nazgûl enemy is basically a Black Rider with three more hit points as far as stats are concerned and three additional hit points is actually pretty huge. The Morgul Wraith unlike the Black Riders does not have the potential to forcibly engage the first player and perform additional attacks but it does have some nasty tricks of its own. If the One Ring is exhausted the Morgul Wraith drops from 45 engagement cost to 15 which is even more potent than the Rider of Mordor’s engagement cost drop (they are getting even more desperate to find the Ring as time goes on and this whole engagement cost dropping shtick is becoming even more powerful, absolutely dripping with thematic goodness) and also becomes immune to player card effects. This is generally an effect that is saved for boss or special enemies to stop players from using cheese or other strategies to discard or defeat them before they should actually be able to do so, so when this sort of ability is given to non-boss enemies it is a fairly big deal. No combat shenanigans, no discarding from play with special effects or anything else of that nature. Now yes this only lasts while the One Ring is exhausted so theoretically could be avoided altogether or may only last a single turn or so but both of these quests feature a couple of encounter effects that may force you to exhaust the One Ring or face even worse punishments, there are also various Burdens you may have picked up by this point of the Campaign that will also force you to exhaust the One Ring if they appear.
There are only two copies of Morgul Wraith in the encounter deck for both quests so you may not even encounter them at all in Passage of the Marshes, there is however also two copies of Call of the Ring which will force you to search for one of the Morgul Wraiths and add it to staging if you cannot or chose not to exhaust the One Ring and reveal an additional encounter card instead.
Now lets imagine that you do choose to exhaust the One Ring and reveal a card instead and you then reveal a Morgul Wraith, well not only did you end up with the Wraith anyway but now because the One Ring is exhausted it has 15 engagement cost and is immune to player card effects. I’ve had this happen to me before and it is both hilarious and brutal when it happens.
Now this exact same Nazgûl enemy card is also included in Shelob’s Lair as well as Call of the Ring so basically the exact same threat exists within both quests. In Shelob’s Lair however you are forced to add a Nazgûl enemy to the staging area as soon as you clear the Morgul Vale near the very start of the quest so unlike Passage of the Marshes where you can potentially fly under their radar completely there is at least one point in which you must add a Nazgûl to staging and potentially face it in Shelob’s Lair.
You are also forced to either exhaust the One Ring or discard one card from every players hand when you explore the Morgul Vale and if you choose to exhaust the One Ring then that Morgul Wraith you just added to staging is almost certainly engaging this turn and gains immunity to player cards. Once you clear stage 1B of the quest by clearing Smeagol’s Secret Way you are given the option to discard a whopping THREE random cards from EACH players hand to discard all Nazgûl enemies in staging immediately. Honestly as cool and thematic as this option is I would almost always rather just deal with the Nazgûl than lose three cards in each player/decks hand. Also the Nazgûl must be in staging so if you did happen to engage it due to its engagement cost dropping to 15 then you can’t even utilise this option anyway. Some pretty brutal mechanics and choices there for sure and the Morgul Wraith seems to be a more troublesome foe in Shelob’s Lair and almost appears as a sort of mini boss that you must either face or sneak past before then taking on Shelob later in the same quest.
Morgul Wraith
Actual Stats: 4 Threat, 5 Attack, 4 Defense and 9 hit points – takes 13 total attack strength to take out in one hit.
The Morgul Wraith is basically the strongest non-unique Nazgûl we’ve seen so far
Additional Abilities: Whilst not as diabolical as certain encounter effects can be, the ability on the Morgul Wraith can be pretty deadly and can turn an already strong and troublesome enemy into even more of a problem by letting it engage you before you may have been ready and giving it immunity to player cards. I would say take it out as fast as you can but with nine hitpoints this is easier said than done as you will need to commit some serious offensive power (and probably multiple characters possibly across multiple turns if you don’t have really high offensive output) to take this Nazgûl down.
The Battle of the Pelennor Fields


Here’s where things get really crazy and ramped right up to eleven. So first off we get the single strongest non-unique Nazgûl enemy in the game as far as purely stats are concerned in the form of Wraith on Wings. This is not only the first non-unique Nazgûl to have more than five base attack but it also has a somewhat ridiculous twelve hit points.. that is almost half the Balrog’s hit points! You are forced to add a copy of Wraith on Wings for each player/deck to the staging area upon reaching Stage 2 of The Battle of Pelennor Fields so these guys appear fairly early on. They do have a very high engagement cost of 45 but that drops by 1 point every turn they are in play as you must put a resource on Wraith on Wings at the start of every quest phase which reduces its engagement cost by 1 and raises its threat by 1. This does have a limit of five so the most threat it can have is 5 and the lowest its engagement cost can drop is to 40. Now yes you can avoid these guys altogether if you stay under 40 threat for the whole game but good luck doing that in such an intense, long and epic quest! Also these Nazgûl are Burden cards that are unavoidably earned. Yes that’s right! I haven’t yet mentioned that these guys are Burden cards as well so at the end of The Battle of the Pelennor Fields they are added to the campaign pool and will be included in the final three Saga quests.
Then we get The Witch King in all his trappings and glory and he has the same stats (except for 3 more hit points) as his version in Massing at Osgiliath. Once again we see the 666 stat block and I can’t help but think this has to be a cool little easter egg. This version of The Witch King is easily his strongest and most fearsome appearance and he is a boss that should not be taken lightly. He first appears at Stage 3 with his Captain side face up and he sits in the staging area immune to player card effects and also cannot take damage. He has 50 threat so he won’t ever engage you and instead he simply adds an additional enemy from the encounter deck to the staging area at the start of each quest phase. Straightforward but considering how intense this quest already is the additional enemy every turn certainly doesn’t help.
Once you hit Stage 5 though he flips to his Sorcerer side and the actual battle begins. He’s still immune to player card effects (and so are his shadow cards!) thanks to the text on Stage 5B and he also gains a Fell Beast mount thanks to the text on Stage 5A which essentially boosts him up to 7 threat, attack and defense across the board, reduces his engagement cost to 40 AND returns him back to the staging area at the end of every round. I haven’t even mentioned his abilities yet! He auto engages the first player at the start of the encounter phase and makes an immediate attack which means he will then also make a normal attack during combat as well. So two attacks every turn minimum at 7 attack strength plus whatever uncancellable shadow effects those attacks gain. Finally only the engaged player (which will almost always be the first player outside of shenanigans) can declare attackers against The Witch-King so any Ranged attackers that other players/decks may have cannot help out at all. Now this really limits how quickly you can take him out as it makes it much harder to simply keep back a whole ton of characters across multiple players/decks until combat to do one huge attack against him with as many characters as possible. This combined with his seven armor (with the Fell Beast attached), 14 hit points and immunity to player card effects means there is very little chance or opportunity to take him out quickly and you will likely instead have to take him down over multiple turns.
One other thing worth mentioning is that when you hit Stage 5B of this quest all the Harad enemies that made it to Mordor way back when you played Journey to the Cross-roads are added to the staging area so The Witch King will not only have backup from the encounter deck and whatever enemies appear normally (including those Wraith’s on Wings if they’re still around) but will also have backup from a small horde of Haradrim including more than likely at least one Mumakil. This is the ultimate showdown with The Witch King and it is no easy feat by any means but this quest provides such a glorious victory if/when you beat it. I have only reached this far in the Saga Campaign a handful of times so have only ever played this quest those few times. It is easily one of the quests I am most looking forward to during my current Nightmare Saga Campaign I recently started.
Wraith on Wings
Actual Stats: 0-5 Threat, 6 Attack, 4 Defense and 12 hit points – takes 16 total attack strength to take out in one hit.
The Wraith on Wings is hands down easily the strongest non-unique Nazgûl in the game.
Additional Abilities: The Wraith on Wings may not have any additional abilities that lead to additional attacks for example but they honestly don’t need anything else to be devastating enemies. Their stats are huge and taking one down is no easy feat considering their massive amount of hit points.
The Witch-King
Actual Stats: 6/7 Threat, 6/7 Attack, 6/7 Defense and 14 hit points – takes 21 total attack strength to take out in one hit while Fell Beast is attached. The Witch-King is the ultimate Nazgûl enemy throughout the entire game. He has beastly stats, strong abilities, immunity to player cards (his shadow cards too) and is just an all around monster of a boss enemy.
Additional Abilities: The Captain side of The Witch-King, even though he sits in staging and doesn’t engage, is honestly almost as nasty as his Sorcerer side. This quest is already very difficult to overcome so additional enemies being thrown at you every round is not at all something you want to deal with for too long. Once he flips he becomes even more of a menace providing one of the strongest combat encounters for the entire game with his high stats and guaranteed two attacks per turn.
The Black Gate Opens

We’re nearing the end of the Saga Campaign with only a few Nazgûl enemies to go. One of the last Nazgûl to appear in the Saga Campaign is the dreaded Nazgûl of Mordor which appears in The Black Gate Opens. Once again we see non-unique Nazgûl enemies with six attack strength when early on in the campaign their highest base attack was five. Similarly the Nazgûl of Mordor has four armor and nine hit points just like the Morgul Wraith. The ability is reminiscent of the version of The Witch-King in Massing at Osgiliath as the engaged player is forced to raise their threat by 4 after the Nazgûl of Mordor attacks or return it to the staging area. This sort of effect is so nasty and really forces you to make a difficult choice. Do you raise your threat so that you can actually counter attack and try to remove the Nazgûl from play or do you just let it return to staging and focus on trying to destroy other enemies instead, letting its threat go back to staging and knowing it will only re-engage later (possibly the very next turn) and provide you with the same annoying dilemma once again. The majority of the time I would take the threat hit unless I know I have no chance of dealing it any damage and can’t really afford that much additional threat in which case I may let it return to staging instead. I would also just like to say that the art on this card is just so damn amazing, it is easily amongst my top 3 favourite Nazgûl art pieces in the game. The details on the flaming sword and fell beast are just s0 spectacular and the framing of the art within the card works so well.
So the actual quest: The Black Gate Opens, is basically an unwinnable quest in which you are literally just trying to last as many rounds as possible so that Frodo has the chance to destroy the ring during the next and final scenario Mount Doom. The quest also features the Dire keyword meaning that you threat out at 100 threat not 50. Another thing worth noting is that if you take out any copies of the Wraith on Wings (which is added to the Campaign Pool remember so they follow you after Battle of Pelennor Fields) during this quest they are removed from the Campaign Pool and will not be added to the final Saga quest Mount Doom. This can be massively beneficial as the Wraith on Wings actually start in staging at the beginning of the game which is pretty horrific and adds a big difficulty spike to any quest they are added to as both a big boost to threat in staging as well as providing additional extremely tough enemies. Removing them from the Campaign Pool should honestly be the main focus when playing The Black Gate Opens outside of obviously lasting as long as you possibly can. This may in a round about way may make the Nazgûl of Mordor somewhat more manageable at times as you will often need to focus your counter attacks on any Wraiths on Wings in play instead and it may even potentially be advantageous or at the least not as much of a blow allowing a Nazgûl of Mordor to return back to the staging area.
Nazgûl of Mordor
Actual Stats: 4 Threat, 6 Attack, 4 Defense and 9 hit points – takes 13 total attack strength to take out in one hit.
Additional Abilities: The Nazgûl of Mordor is a fearsome opponent with strong stats and an ability that allows him to bounce back to staging constantly if you don’t take the threat hit. Unless you can take one out in a counter attack the same turn it engages you or at the least dish out some decent damage to it I’d just let them return to staging and focus on taking out any Wraith on Wings or other nasty enemies that may be in play instead.
Mount Doom

We have reached the final quest of the Saga Campaign; Mount Doom and the last Saga Campaign Nazgûl enemy; The Ringwraith of Sauron. This enemy is reminiscent of and almost a throwback to the first Nazgûl enemy we see in the Saga Campaign, The Black Rider, as they have very similar abilities. Rather than engaging and immediately attacking when a Hide test is failed the Ringwraith of Sauron does the same but when a Fortitude test is failed instead. Fortitude tests are similar to Hide tests but rather than only having to perform them due to Encounter card effects you are forced to perform regular Fortitude tests while on Stage 2B and 3B of Mount Doom due to Quest Stage effects. This means that Fortitude Tests will generally stay more relevant and important than the Hide tests in each respective quest and there are potentially more opportunities for the Ringwraith to take advantage of any failed tests. The similar abilities are where the similarities end however as stat-wise the Ringwraith of Sauron is far more troublesome than the Black Riders or many other earlier Nazgûl enemies in the Saga Campaign for that matter. At a whopping six attack and ten hit points this Nazgûl has more hit points and the same attack value as both copies of Khamul the Easterling! It does only have three defense however so is a little easier to damage in the first place compared to most Nazgûl as the most common and standard defense value for them across the board is four.
The Ringwraith of Sauron hits just as hard as the Nazgûl of Mordor from The Black Gate Opens and it takes the same total attack strength to take both of them out in one go. The Nazgûl towards the end of the Saga Campaign certainly get a big boost in their power levels compared to the earlier versions and this is yet another thematic win. We know that they received improved mounts in the Fell Beasts (over their black steeds) and we also know that The Witch-King was channeling his masters power during the Siege of Gondor and Battle of the Pelennor Fields and even thought he could potentially take Gandalf the White down or at the least was more than willing to fight him in direct combat.
The Nazgûl’s original mission was essentially one of stealth as they were sent out to investigate The Shire and ultimately to try and find the One Ring and bring it back to their Master.
Once Sauron decides to march on Gondor and siege Minas Tirith however the Nazgûl are sent as elite shock troops spreading their fear and black breath across the battlefield and besieging Gondor atop their Fell Beasts.
It makes perfect sense for the Nazgûl to get stronger as you advance through the Saga Campaign as they are getting more and more desperate (as is their Master; Sauron), receive Fell Beasts and are eventually sent out as elite warriors rather than scouts on a stealth mission.
This quest will also include any copies of the Wraith on Wings that were not defeated and removed from the Campaign Pool during The Black Gate Opens so this may not be the only Nazgûl you encounter. As I mentioned above I definitely think that the core objective when playing The Black Gate Opens, outside of obviously lasting as long as possible, should always be taking out any copies of Wraith on Wings to remove them from the Campaign Pool making Mount Doom much more manageable.
Ringwraith of Sauron
Actual Stats: 3 Threat, 6 Attack, 3 Defense and 10 hit points – takes 13 total attack strength to take out in one hit.
Additional Abilities: The Ringwraith of Sauron is yet another brutal Nazgûl enemy that has stats similar to or even higher than many boss or mini boss enemies throughout the game. Extra attacks from a six attack strength enemy can spell your doom or an instant hero death if you aren’t prepared. As is the case with many of the Nazgûl enemies we have looked at so far you will ideally want to take this foe out as quickly as possible.
The Morgul Vale

All of the Nazgûl enemies from the Saga Campaign, Core Box and Massing at Osgiliath have now been covered but there are still a couple of last ones that actually appear during certain quests in the various Cycles. The first of which is the Nazgûl of Minas Morgul who appears as the third and final Captain/Boss enemy in the quest The Morgul Vale. This is the final quest of the Against the Shadow Cycle and even though Lord Alcaron is basically the main protagonist throughout the entire cycle he is still only the second Captain/Boss enemy you face in this quest with a Nazgûl riding out from the gates of Minas Morgul personally to finish things off and take you down on the final quest stage.
This Nazgûl is not holding back or playing around! At a whopping seven attack strength it has the highest base attack of any single Nazgûl enemy in the entire game and although it may only have a very low value of 5 hit points it has an ability that completely negates this fact. The Nazgûl of Minas Morgul can basically only ever take 1 damage at a time from any source of damage, it must be dealt at least 1 damage a total of five times to defeat it. Now if you didn’t have any sort of way to deal direct damage that could potentially result in you being forced to deal a single point of damage during combat via simply attacking the Nazgûl over five rounds in order to defeat him. Each player can potentially declare attackers against him each combat however if they have Ranged characters so in a two player game you may be able to deal 2 damage to him a turn during combat simply by each player declaring a separate attack on him during combat. This will require Ranged attackers belonging to one player/deck with a total attack value of at least five to get through the Nazgûl’s armor. You can obviously utilize any forms of direct damage that exist to make this fight faster and if your deck happens to have a few different ways to deal direct damage then this fight may not be that difficult at all and you may just beat the Nazgûl with relative ease within a couple of turns. Regardless of how this fight is approached it would be very difficult to dispatch him within one turn so that in of itself is actually a pretty big deal, you may have an insane amount of offensive power and output and be able to attack him with like 15+ total attack strength but that is only ever going to deal a single point of damage to him as you are forced to slowly whittle him down.
Just as an aside not only does the normal version of this quest feature the Morgul Bodyguard, who redirects all damage done to Captains to itself, but the Nightmare version of this quest features an enemy called Warrior of Nurn who not only heals all damage from Captains at the end of every round and gives them plus one defense but if the Warrior of Nurn shows up as a Shadow card it ALSO heals all damage from any Captains in play. Basically the Encounter deck is most certainly not just sitting there waiting while you whittle the Nazgûl of Minas Morgul down and is actively throwing effects at you to not only prevent but also heal damage (in Nightmare mode at least) from him. Imagine getting four points of damage onto the Nazgûl only needing one more to achieve victory and a Warrior of Nurn appears instantly undoing all your hard work.
The Nazgûl of Minas Morgul is rather unique not just for a Nazgûl enemy in general but as an enemy within the entirety of the game. His ability really forces you to either get creative and include various direct damage effects or to have an epic showdown with him across multiple rounds. While he is similar in that like every Nazgûl he either cannot have attachments at all or can only receive Morgul attachments (no Morgul attachments in this quest so he receives the former) he is very different from the Nazgûl we encounter during the Saga Campaign. He does not have any sort of effect linked to the One Ring (because of course there is no One Ring present during the Quest and cycle he is featured in), doesn’t have any sort of engagement cost lowering effect or anything else of a similar nature to the other Nazgûl enemies.
Worth noting is that The Nazgûl of Minas Morgul is more than likely the Witch-King himself however I’m not sure if we have confirmation on that or not, I will need to go back and re-read the insert for The Morgul Vale!
Nazgûl of Minas Morgul
Actual Stats: 4 Threat, 7 Attack, 4 Defense and 5 hit points – would only take a total of 9 attack strength to take out in one hit if not for his special ability. Without any direct damage effects or combat shenanigans it takes a total of at least 5 attack strength during five separate attacks to take this monster down.
Additional Abilities: The only real ability the Nazgûl of Minas Morgul has is that he can only ever take a single point of damage at a time but honestly that’s all he needs. The Morgul Vale is already a diabolically hard quest to beat that features two other mini-bosses before you even reach the Nazgûl and his 7 base attack is troublesome in of itself.
The Power of Mordor Encounter Set

The final Nazgûl enemy in the game is a different version of Khamul The Easterling, who also appears during the Nightmare version of A Shadow of the Past. This version of Khamul is included in The Power of Mordor Encounter set which is only used in the following two quests: Temple of Doom and The Fortress of Nurn. These are both featured in the final cycle for the game: the Vengeance of Mordor cycle.
The Power of Mordor Encounter Set basically represents the fact that you are so extremely close to Mordor (or even IN Mordor in the case of Fortress of Nurn!) that you are within the reach of Sauron’s awesome and terrifying power and influence. You are so close to his Watchful Eye, and within reach of The Tower of Barad-Dûr that your very will is sapped by the great Darkness covering the land, his armies and minions are far more brave and cunning than usual and one of his mighty Nazgûl may even be sent out to investigate your presence!
Even though it is only made up of 5 cards it is honestly easily hands down the most brutal and nasty Encounter Set that exists within the entire game. That is why rather than actually being shuffled into the Encounter Deck this special Encounter Set is put aside as its own Power of Mordor deck and cards from it are only revealed and added to the staging area upon specific circumstances.
During Temple of Doom the Encounter Side Quest Tribute to Mordor reveals and adds the top card of the Power of Mordor deck to staging anytime it has four damage or more. Considering at least one damage token will be placed here every single turn this means that every four turns one of the Power of Mordor Encounter cards enters play. If you absolutely speed through the quest you may only have to reveal a few Power of Mordor Encounter cards however the quest stages in this quest are super punishing and are designed to hold you up or really mess with your board state as much as possible so speeding through this quest is near impossible or at least very tough.
The Fortress of Nurn takes a different approach and instead reveals and adds the top card of the Power of Mordor deck to staging whenever you clear one of the four Castle Side Quests as well as instantly revealing one once you reach Stage 2B. Due to the fact you must clear three Castle Side Quests to even reach Stage 2 and Stage 2A instantly reveals a card from The Power of Mordor Deck you will basically always be forced to deal with four of the five Power of Mordor Encounter Cards. I have only actually attempted The Fortress of Nurn a few times and have yet to beat it as it is no joke at all and very likely one of the hardest quests in the game.
Enough about The Power of Mordor Encounter Set, lets talk about Khamul! I’m going to start this off by just saying, yes Khamul is a fearsome foe and is in no way a pushover or easy enemy to deal with, however, he is easily hands down the card I would always prefer to see appear and get added to play first from The Power of Mordor deck – except perhaps Under the Watchful Eye, in certain situations and if both decks are at reasonable threat levels and don’t have many cards in hand at the time . The four other cards are just so intense and can turn a game around so quickly or even create an instant loss depending on your board state. Khamul will never immediately cause a loss upon being revealed and added to the staging area and he is simply an additional pseudo-boss enemy that gets added to the mix.
He is completely immune to player card effects rather than just player attachments so no combat tricks or player card effects can be used against him. As well as this only the engaged player can declare defenders or attackers against him so he basically stops both Sentinel and Ranged being utilized against him.
His stats are pretty meaty with a high six attack strength and a decent four armor and nine hit points, he actually has the exact same stats as the Nazgûl of Mordor from The Black Gate Opens.
One other thing worth mentioning is that he does auto engage the first player each turn no matter what your threat levels are so due to this fact he can potentially be a much bigger threat when he engages a player or deck that isn’t very combat focused and may not exactly be able to handle him like other decks or players in the game can. He may be worth taking out sooner rather than later for this reason alone and before he engages a player or deck that cannot actually handle him.
Khamul, while strong, doesn’t pose any sort of immediate or ongoing threat outside of combat. He also doesn’t perform additional attacks or raise your threat like many other Nazgûl. That being said the two quests he appears in are already absolute slogs with lots of extremely nasty encounter effects and mechanics going on as well as many other strong foes so honestly Khamul really doesn’t need to be any stronger than he already is.
Khamul the Easterling
Actual Stats: 4 Threat, 6 Attack, 4 Defense and 9 hit points – takes 13 total attack strength to take out in one hit.
Additional Abilities: While he is a strong foe that is not only immune to player card effects but also Sentinel and Ranged as well he just does not compare to the other Power of Mordor Encounter cards. That being said he is a very strong enemy that appears in two already difficult quests that feature plenty of other fearsome foes.
Morgul Attachments


So what’s actually the go with all those Nazgûl who have “cannot have non-Morgul attachments” rather than simply cannot have attachments and what exactly is a Morgul attachment? There are basically two types of Morgul attachments, the first are treacheries that turn into attachments for Nazgûl enemies giving them a boost of some sort and the second type are treacheries that turn into attachments for player characters that represent wounds with lasting effects (physical or spiritual) inflicted by a Nazgûl. I will just be talking about the Morgul attachments that Nazgûl can receive.
Early on in the first three Saga Campaign quests you can potentially encounter the above two Morgul attachments being attached to Nazgûl enemies. Pale Blade is included in A Knife in the Dark and Flight to the Ford and Black Steed is included in A Shadow of the Past and Flight to the Ford. Both the Pale Blade and the Black Steed can make already strong and problematic enemies much worse.
Pale Blade will not only boost the attached enemy’s attack value by 1 but it also gives them immunity to non-combat damage. This means that they can only take damage from attacks being declared against them and resolved. Now direct damage isn’t really something that lots of player decks actually include or utilize as it is often best against very specific quests or needs to be built around for it to be worthwhile so this isn’t really that big of a deal. This does certainly stop something like ally Gandalf’s direct damage effect however which IS commonly used and included in many player decks.
Black Steed reduces the attached enemy’s engagement cost by 10 and returns them to the staging area at the end of every refresh phase. This allow the Nazgûl who received the Black Steed to constantly return back to the staging area every turn contributing its threat against questing and possibly creating other issues as well. Anytime a Nazgûl receives a copy of Black Steed I focus on bringing them down as soon as possible so that they don’t start to bounce back and forth between the Staging area and being engaged potentially creating further issues or allowing encounter effects that target or buff enemies in staging to trigger.


Later on in the Saga Campaign we get some more Morgul attachments that Nazgûl can receive in the form of their flying steeds the Fell Beasts. The Fell Beast encounter card appears only in The Battle of the Pelennor Fields and the Hell-Hawk encounter card appears only in The Black Gate Opens.
The Fell Beast Morgul attachment appears in The Battle of Pelennor Fields, in which the only Nazgul present are the copies of Wraith on Wings or The Witch-King himself. Both of these Nazgûl enemies are already absolute powerhouses and become frankly ridiculous when they not only get a boost to their stats across the board but -10 engagement cost and the ability to return back to the staging area at the end of each round via a Fell Beast. This Morgul attachment could spell doom for player decks trying to avoid the copies of Wraith on Wings in combat altogether as they can be lowered all the way down to 30 engagement cost via their innate ability and a Fell Beast combined together.
The Captain side of The Witch-King has 50 engagement cost and also cannot be optionally engaged, he basically cannot leave the staging area and is simply meant to sit there contributing his six threat and adding an additional enemy into play each round. Fell beast completely and utterly changes this by lowering his engagement cost to 40, this means that The Witch-King can ride out and fight you much earlier than anticipated if your threat is 40 or higher and he receives a Fell Beast attachment early. The Witch-King cannot take damage while on his Captain side so having to face him early before you can even do anything back to him is actually pretty horrific and can make this quest far more difficult than it already is. Fell Beast honestly may even be worth cancelling completely via Test of Will or other player effects depending when it appears as it can drastically change the flow and difficulty of this quest.
Hell-Hawk while still very nasty doesn’t exactly provide quite the opportunity that the Fell Beast does – that is, allowing the Witch-King to basically engage in combat much earlier at a point where without a Fell Beast he never normally would. Instead it gives a simple boost of +2 to all stats rather than the +1 Fell Beast provides (except for hit points) and gives the attached Nazgûl immunity to player card effects. The only two Nazgûl enemies in this quest are the Nazgûl of Mordor and the Wraith on Wings, again both of which really don’t need buffs to already be difficult and scary foes. A Wraith on Wings with a Hell-Hawk attached can result in a seven threat, eight attack, six defense and twelve hit point behemoth of an enemy that is immune to player card effects!
Now I may not have been entirely honest about Hell-Hawk not having some crazy special interaction or ability like Fell Beast does; if there is no Nazgûl enemy in play for you to attach Hell-Hawk to then you have to instead search the Encounter Deck, Encounter Discard Pile and…. Victory Display… for a Nazgûl enemy and add it to the staging area. You actually do have the flexibility of choosing either option however if you cannot attach it to a Nazgûl enemy then you must fulfil the other effect. Should this actually occur I would strongly recommend adding a copy of Nazgûl of Mordor from the Encounter deck or discard pile to staging rather than a copy of Wraith on Wings as the last thing you want is to return a copy of Wraith on Wings from the Victory Display as it will no longer be removed from the Campaign Pool for Mount Doom if you don’t then take it out a second time and put it back in the Victory Display.

Final Thoughts
Being such iconic and integral characters to the overall story and world of Middle Earth – at least during The Third Age – and given they are the Dark Lords chief servants it only makes sense that the Nazgûl we see within this game receive fantastic artwork, strong and fearsome abilities and stats, and take on quite an important role within the Saga Campaign.
Due to their importance within Tolkien’s writing however, we do not see that many Nazgûl enemies outside of the Saga Campaign and honestly this is best as it is the most fitting and thematic place for them to appear. There are still a small handful of non-Saga quests you can play and take on a Nazgûl however so you aren’t forced to play Saga to encounter them.
Across the board the Nazgûl enemies and even Nazgûl related treacheries we see are some of the most thematic and fitting cards within the entire game. They are always hunting for the One Ring as well as any information whatsoever as to its whereabouts and this is very much reflected by the fact that many Nazgûl have effects tied directly to the One Ring and many have effects that lower their engagement cost. All Nazgûl also cannot have attachments – outside of Morgul ones – and this very clearly represents the true nature of their physical being. They exist both within the seen and unseen world and are in a way intangible beings and unable to interact with many aspects of the seen world. This also works beautifully mechanically as well, as it stops you from attaching traps or various other attachments that may shut down or severely weaken a Nazgûl. Given they are the Dark Lord’s chief servants it would be rather silly if they could be easily shut down or dealt with by simply attaching traps or other specific attachments to them.
I rather enjoyed creating this article and may turn it into a series. Perhaps next time I could go over the various Troll enemies throughout the game or the different versions of the Balrog we see. Any feedback or suggestions are more than welcome, hope you enjoyed the article!

Hey, look who’s back! Nice to see you (and your wall of text) again.
LikeLiked by 1 person
Thanks dude! I might even resurrect that Nightmare Saga Campaign I never finished.
LikeLike
The problem with Nightmare Saga is that it stops being fun after you come out of Moria. I finished it, but it was endless wave of scoops, losses and reboots, as far as I remember. Breaking of the Fellowship and Helm’s Deep are the most frustrating ones. Good luck with it!
LikeLike
It does indeed get quite difficult and with many moving parts. I’ve never had too much trouble with Breaking in the past but yeah Helm’s Deep is absolutely brutal especially in Nightmare.
I’ve seen many comments and discussions about The Black Gate Opens and Mount Doom being extremely difficult too, will have to find out for myself!
LikeLike